Primavera P6 and Unifier work exceptionally well together. Primavera P6 is widely considered the industry standard solution for the execution and visibility of projects across the organisation. On the other hand, Unifier provides excellent contract management, cost management, capital planning and Portfolio Management capabilities.
There are two options to leverage the combined strengths of Primavera P6 and Unifier. Oracle Primavera Gateway allows data to be moved between the P6 and Unifier on schedule or on demand. The benefit of Primavera Gateway is the ability to map many fields between applications. With the capability to map templates and other customisation features, Primavera Gateway is more flexible and does a better job customising an integration in accordance to your needs. However, Primavera Gateway is more complex to set up.
Primavera P6 also has out of the box functionality to exchange data between Primavera P6 and Unifier, which is accessible directly from the Primavera P6 EPPM application user interface. In many cases, this is a far simpler way to exchange data and take advantage of the strengths both of P6 and Unifier.
Schedule Sheet Integration
In this updated edition of the PrescienceAdvantage® Support Newsletter, we will demonstrate how to set up the out of the box Primavera P6-to-Unifier integration, which is done without the hassle of Primavera Gateway by configuring Schedule Sheet Integration.
Using Schedule Sheets:
- Primavera P6 can send project, WBS, resource assignment, and activity data to Unifier.
- Mappings must be defined in Unifier before sending data from Primavera P6
- P6 project preferences must be configured to integrate with Primavera Unifier, in order to link the Primavera P6 project to a Unifier schedule sheet
(i) In this example, data flow is uni-directional, from Primavera P6 to Unifier, but can be configured to be bi-directional.
(i) The example on the next page is for Primavera P6 EPPM 16.2 and Primavera Unifier 16.2.
Unifier Set Up
The integration of Unifier and P6 assumes that the user has a good understanding of both applications and setting up a P6 project and a Unifier project
- Under the Company Workspace Admin tab, define the Authentication key for the Company.

2. Create your Project, which will be used to integrate with your P6 project.
3. Select Schedule Sheet – this can be found under the Schedule Manager tab, situated on the left hand side of the page in the User tab.
4. Select New to create a schedule sheet.

5. Next, define your Data Mapping under the schedule sheet. Navigate to Data Mapping in the File menu.
6. Under the General tab define the name of your Data Mapping and add a description. You have the option of defining more than one data mapping template.

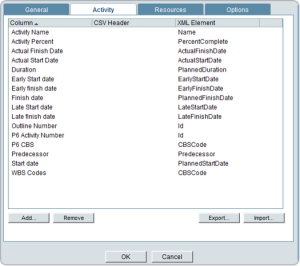
7. Under the Activity tab you have the option to add Unifier fields which you desire to be mapped to corresponding P6 fields. With Schedule Sheet integration you are limited as to which fields can be mapped. You must manually type in the P6 field name.


8. Define the cost codes under the Project Cost Sheet. At least one cost code must be defined.

JOIN PRESCIENCEADVANTAGE® PRIMAVERA SUPPORT
A PrescienceAdvantage® Primavera Support agreement is flexible, scalable and value driven. It offers functional and technical Oracle Primavera assistance, delivered remotely or on-site. Find out more about setting up a Support Agreement for your site, or call us on 1300 086 816.


