How to Create Custom Templates in Primavera Unifier
In this post we will focus on how to create and configure Custom Print in Unifier.
In Primavera Unifier, there are multiple customisation opportunities to fulfill your reporting requirements in the way of user defined reports, custom reports, and custom print.
Customisation of formatted reports is commonly used to include company and vendor logos, complex tabular data, and legal or regulatory text. This would apply for documentation such as contracts, purchase orders or payment certificates.
Primavera Unifier also has the reporting capabilities to perform Custom Print. It can generate XML Schemas, which will then be used to define the custom layouts in Microsoft Word, Excel or in XML Style design tools. For any Unifier business process, you can also export the schema and use it to design a custom layout.
Creating a Payment Certificate Template
We will start with instruction on how to create one of the most commonly used custom templates –the Payment Certificate. Before we begin, it’s important to note that Custom print only works when Unifier and BI Publisher are configured.
The following steps demonstrate how to create custom templates in Unifier:
Step 1: Navigate to Company workspace, Admin Mode.
Step 2: Navigate to Configuration Custom Templates as shown in below image.

Custom prints can be created with Internal and External Data Models. The custom print with Internal Data
Models is mainly used when the user wants to use the Unifier Business Processes data model, whereas an
External Data Model template is using the data schemas defined at BI Publisher level, via the data
connections established in the BI Publisher.
Therefore, you can create the Custom Print by consolidating multiple data sources, not just limited to the
data from one single Unifier’s business process.
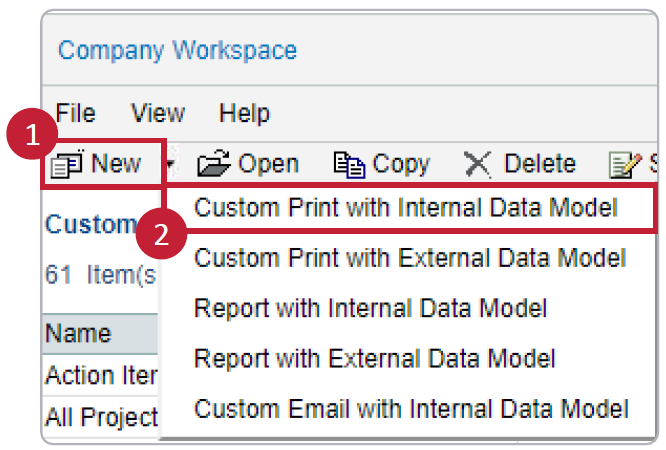
For this example, we will select Custom Print with Internal Data Model.
Step 3: Click on New > Custom Print with Internal Data Model. This will open a new window.
Step 4: Define the Name of the custom template and select the data source to be used. In this case, we will use Payment Applications data source. After defining Name and Data Source, Click Apply.
Step 5: After clicking Apply, it will enable two more tabs in the same window called Template File and Sample Data.


Step 6: Click the Add button under the Template File tab. This will open another window where we can set the Template Name and Template Type and select the layout file.
Unifier offers the following selection of Template Types: RTF, PDF, EXCEL and eText.
Select the layout file to generate the report.


Step 7: Navigate to the Sample Data tab and click Generate.
As you can see in the below, the Payment Application data source has generated sample data in this tab.
Now, click on the Download button to download the XML sample data file.
Click OK; this will save the custom template in Unifier with a DRAFT status.


Step 8: Using MS Word or any XML style design tool, import the sample XML data and create your custom layout in the RTF file.
For example, in our case, we are using BI Desktop Add-Ins in Microsoft Word.
Navigate to the Word File > Options > Add-ins > COM Add-ins and Click Go.

Step 9: Enable the BI Publisher Template Builder for Word 64 – bit and click OK.
This will enable the BI Publisher TAB in your Microsoft Word as shown below.


Step 10: Click on Sample XML and select the XML file which was generated at step 7 using the sample date Download option. Microsoft Word will give the below pop up which notifies the user that the data has been loaded successfully.

Step 11: Now, this enables a variety of options in the BI Publisher tabs as illustrated below. Users can utilise them to add fields, tables, and charts, depending on their requirements.

For example, clicking on Field will provide the user with all the fields in which they can choose to populate their payment certificate. This can be found in the Payment Application data source.
In our example, the custom layout will generate as per the example below. This is after adding all the chosen fields, logos, and formulas.

Step 12: Once the custom template RTF file is created, perform step 6 to upload the latest RTF file.
Step 13: Now, Publish the template by clicking Status > Published


This will change the status of the report from Draft to Published in Unifier. This also means that the template has been published in the BI Publisher catalogue.
Unifier View
BI Catalogue View

Now that you have created a custom report and configuration in Primavera Unifier, you can run the custom print from Unifier Project or Shell.
Navigate to Payment Applications business process and click Print – Customise it by selecting any record in which you would like to generate a payment certificate.

This will open the new window which will show the custom template which we created using the above steps.
Now, Click on the Print button which will generate the PDF report for the selected payment application record (below).
This concludes our walk through on how to create and configure the Unifier Custom Print report function using Internal Data Models.
Custom Print with Internal Data Model extends the data reporting capabilities from Unifier’s data schema. Even within Unifier itself, it can stride across multiple business processes to enrich the report content and break the boundaries of Internal Data Models.


